Jupyter Notebook & Lab
The Jupyter Notebook interactive app launches a private Jupyter session on an ACE HPC compute node and streams it to your browser. You can run Python, R, or bash code in notebooks, visualise results inline, and work interactively with data — all without writing a SLURM job script.
JupyterLab is the newer, full-featured interface with a file browser, multiple tabs, and a built-in terminal. Jupyter Notebook is the classic single-notebook interface. The Modules field on the launch form controls which interface loads — jupyterlab (the default) starts JupyterLab. JupyterLab is recommended for most workflows.
Launching Jupyter
- In the navigation bar, click Interactive Apps
- Select Jupyter Notebook
- Fill in the resource request form (described below)
- Click Launch
- Wait for the session to start — typically 30 seconds to a few minutes
- When ready, click the Connect to Jupyter button
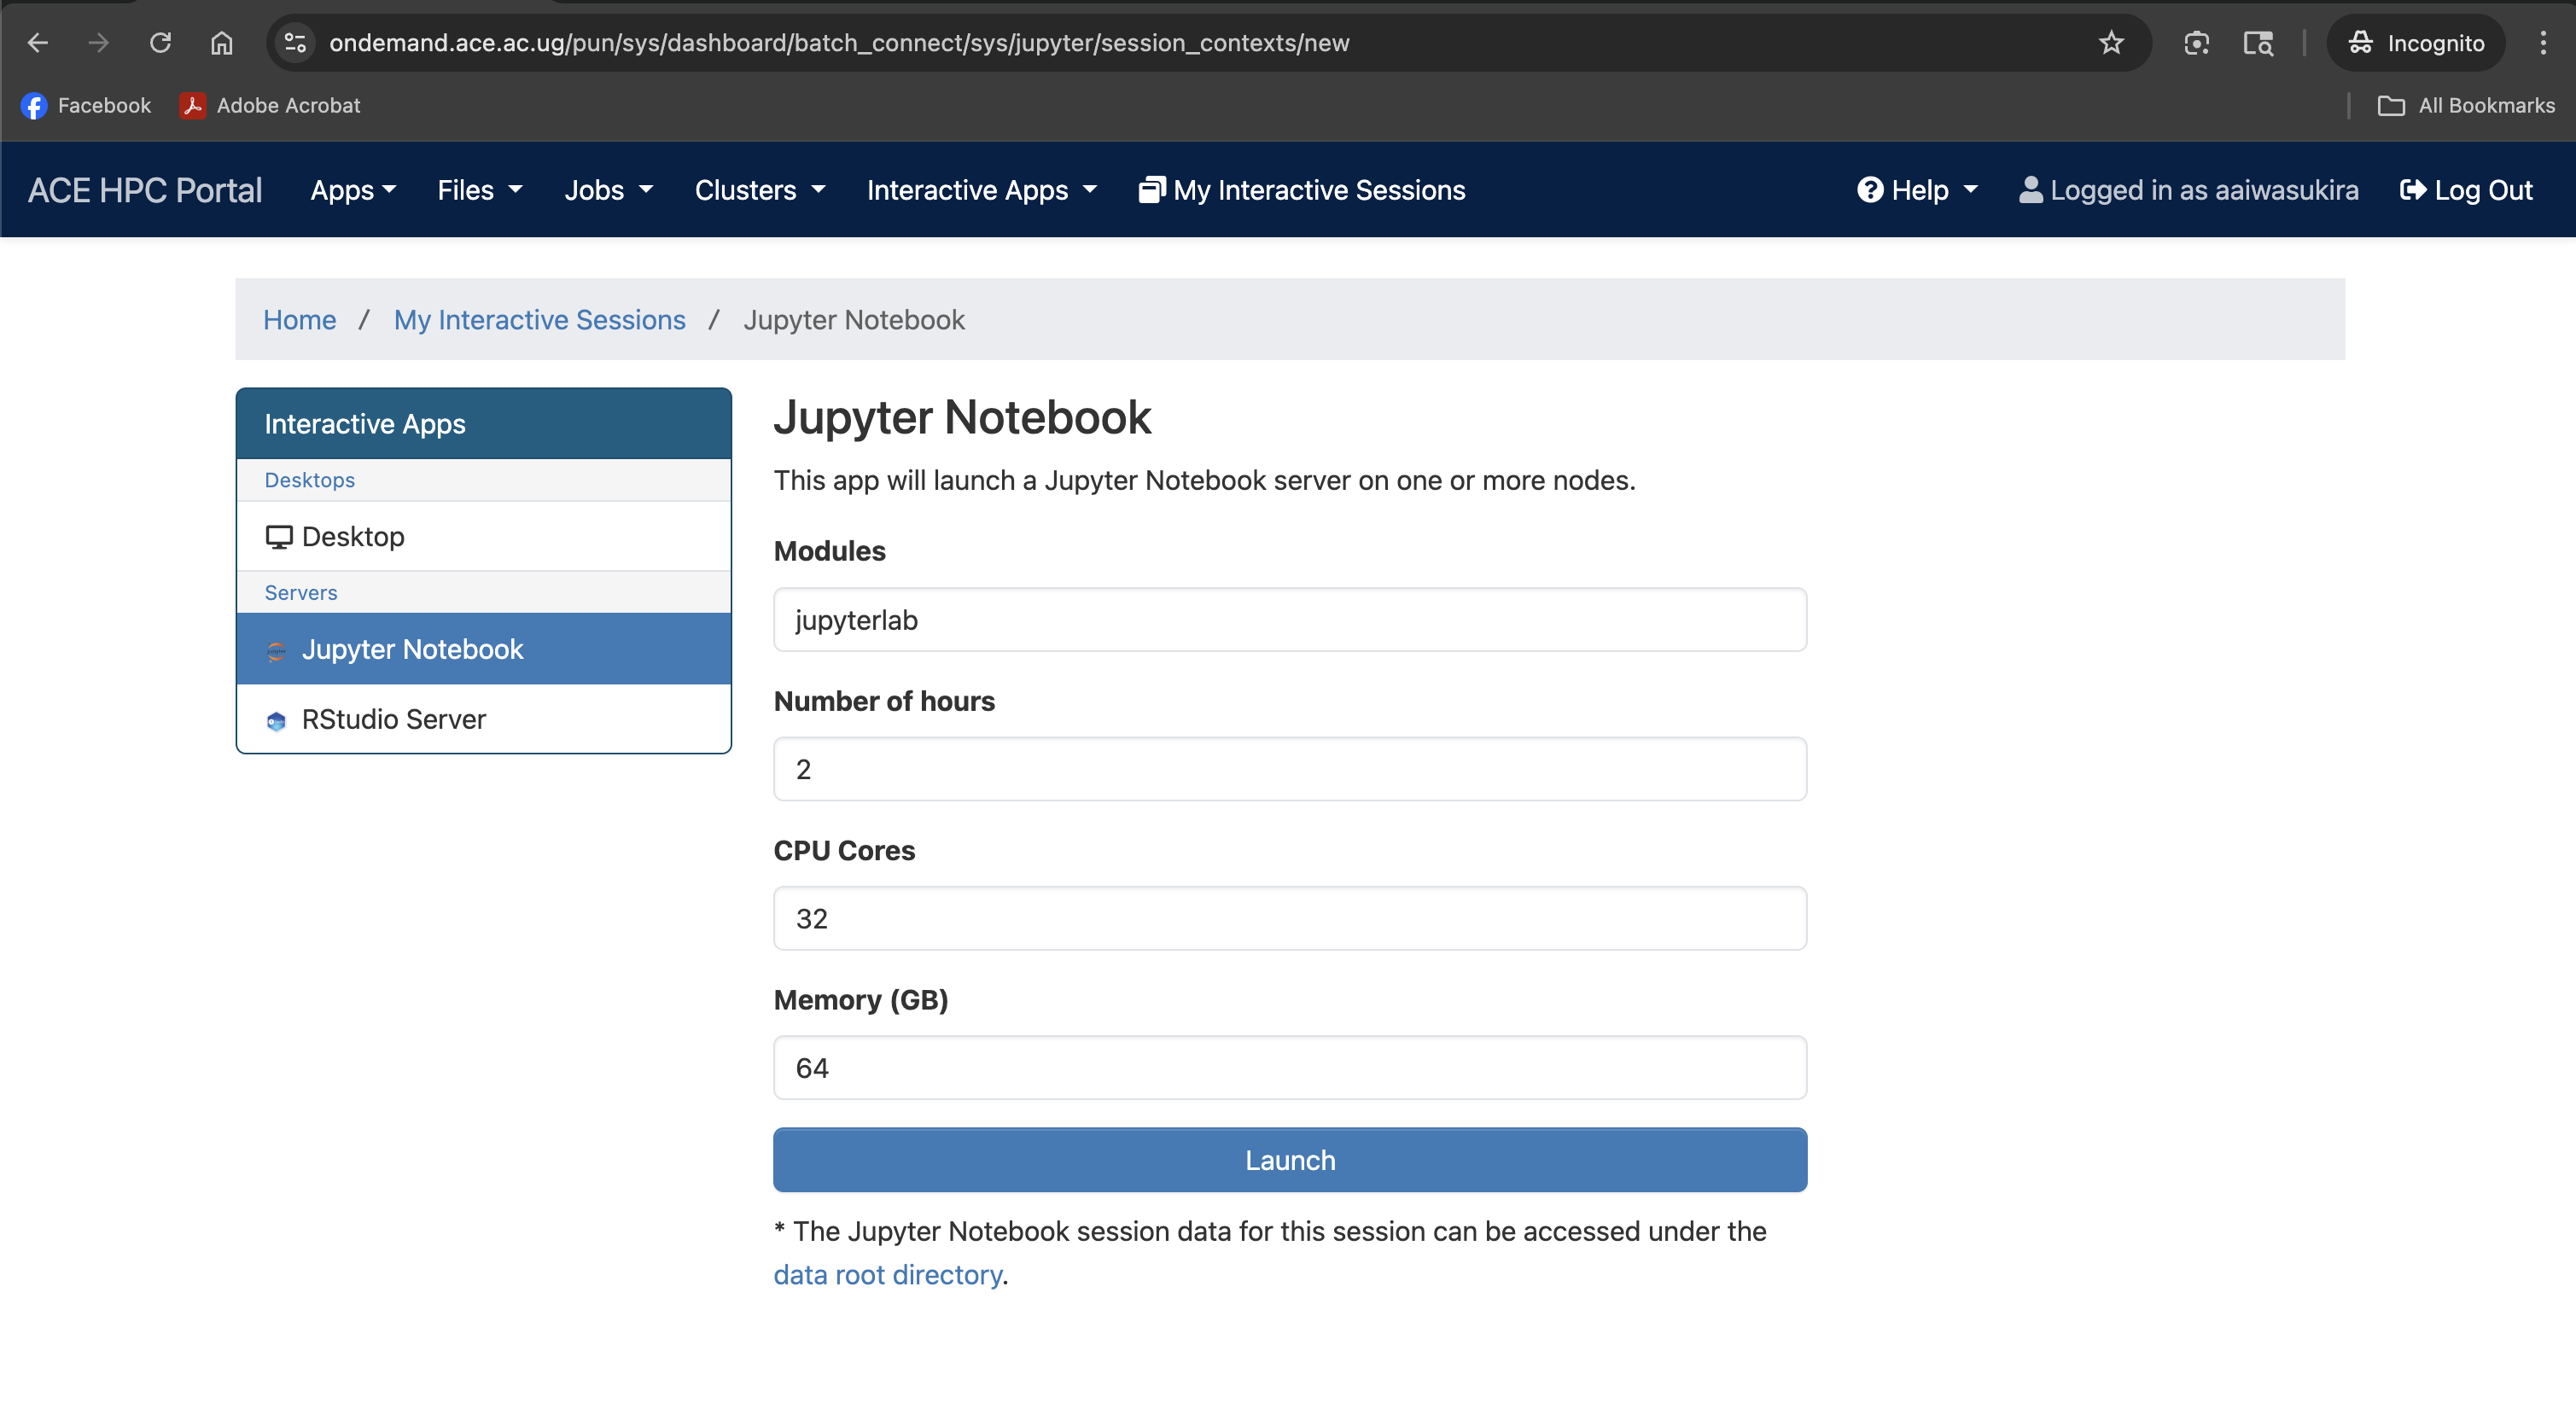
Screenshot note: A screenshot of the request form for resources to start Jupyter Lab.
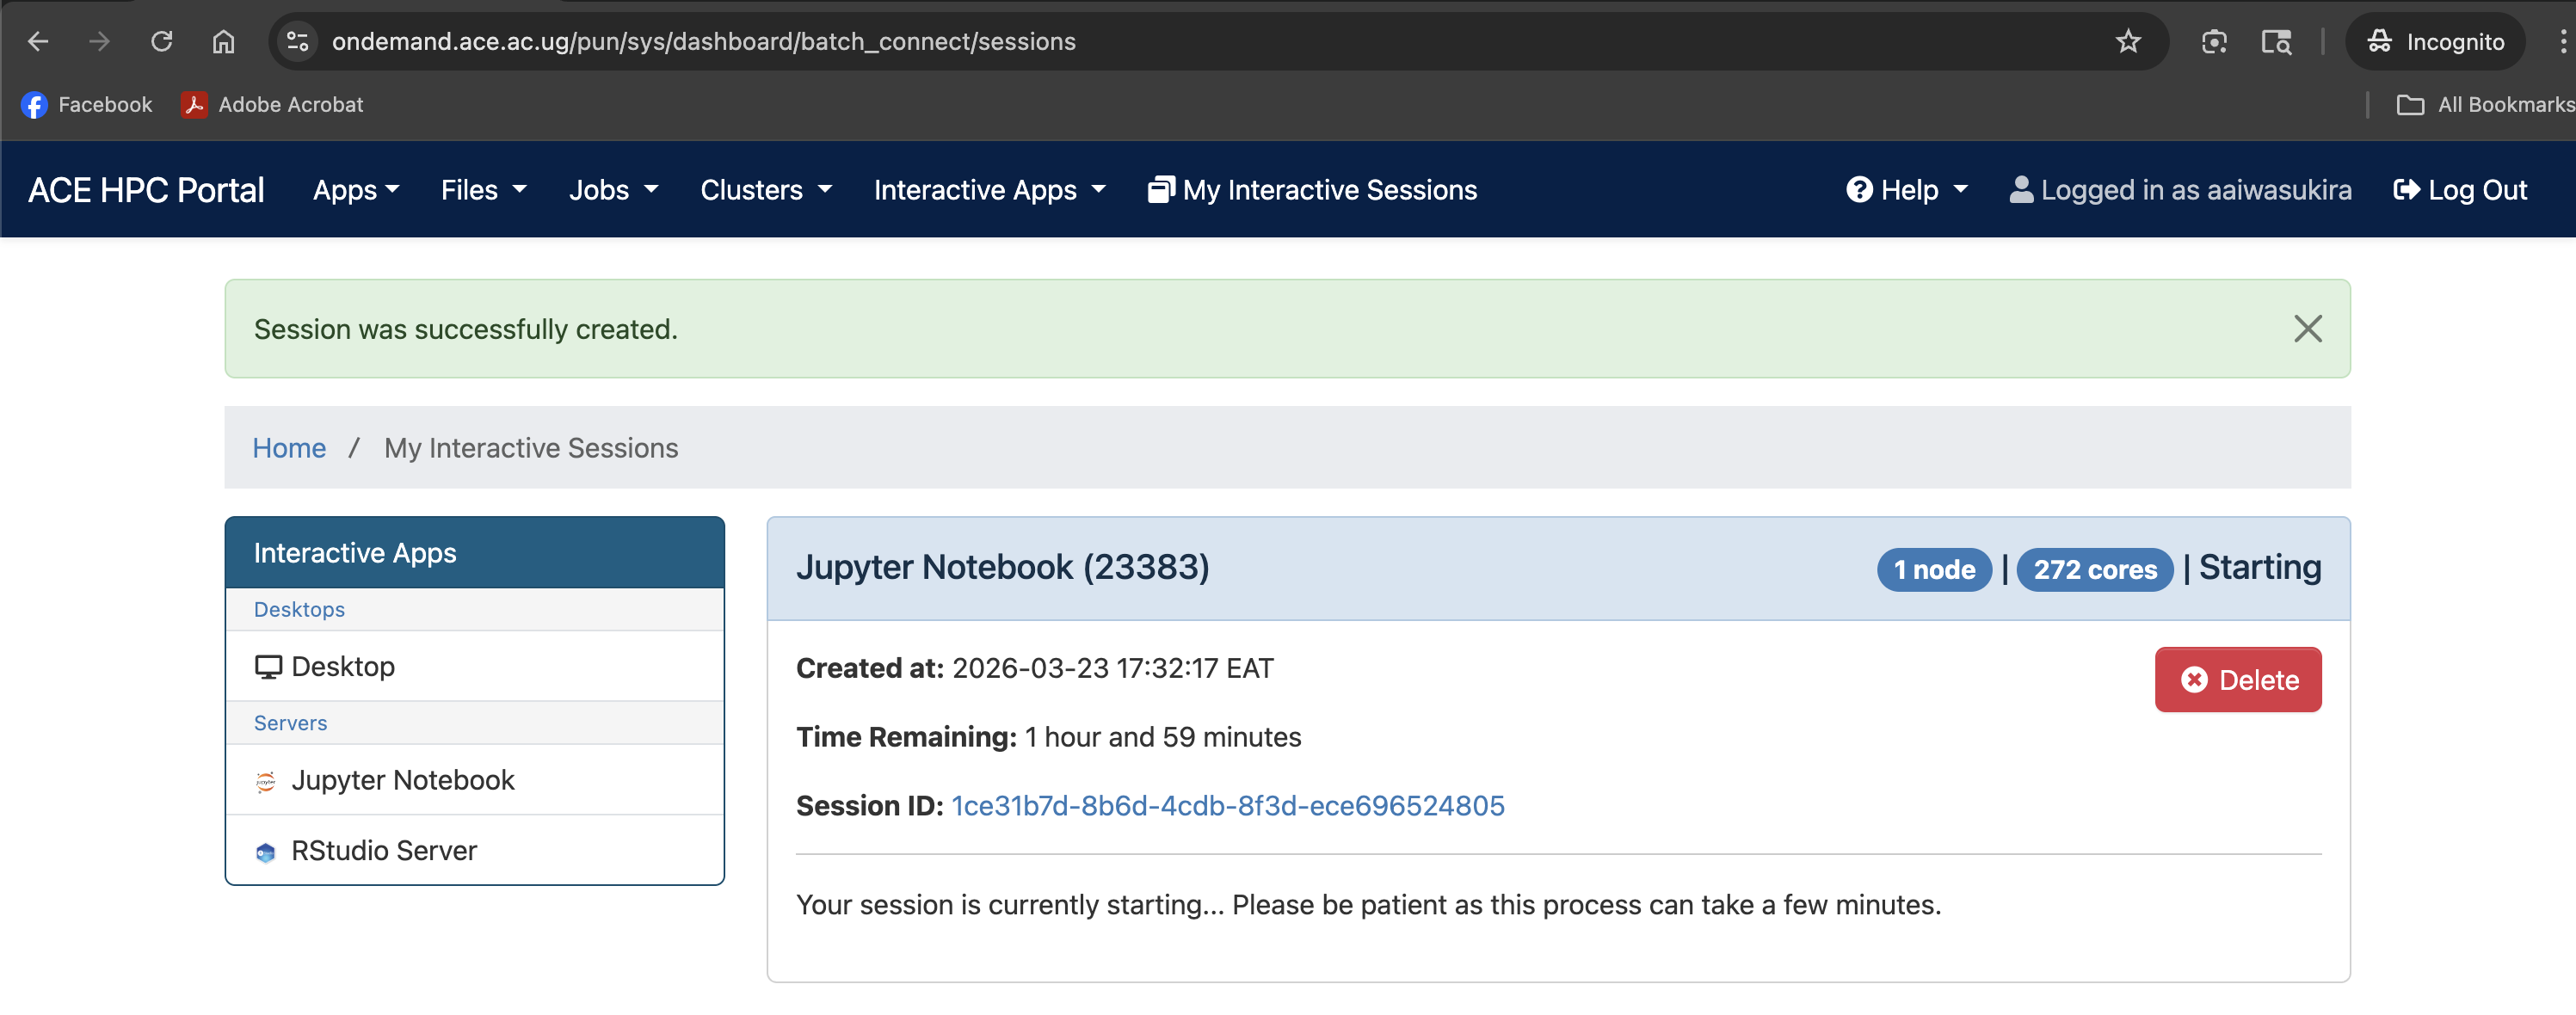
Screenshot note: A screenshot of the session card on the dashboard showing the queued/starting state.
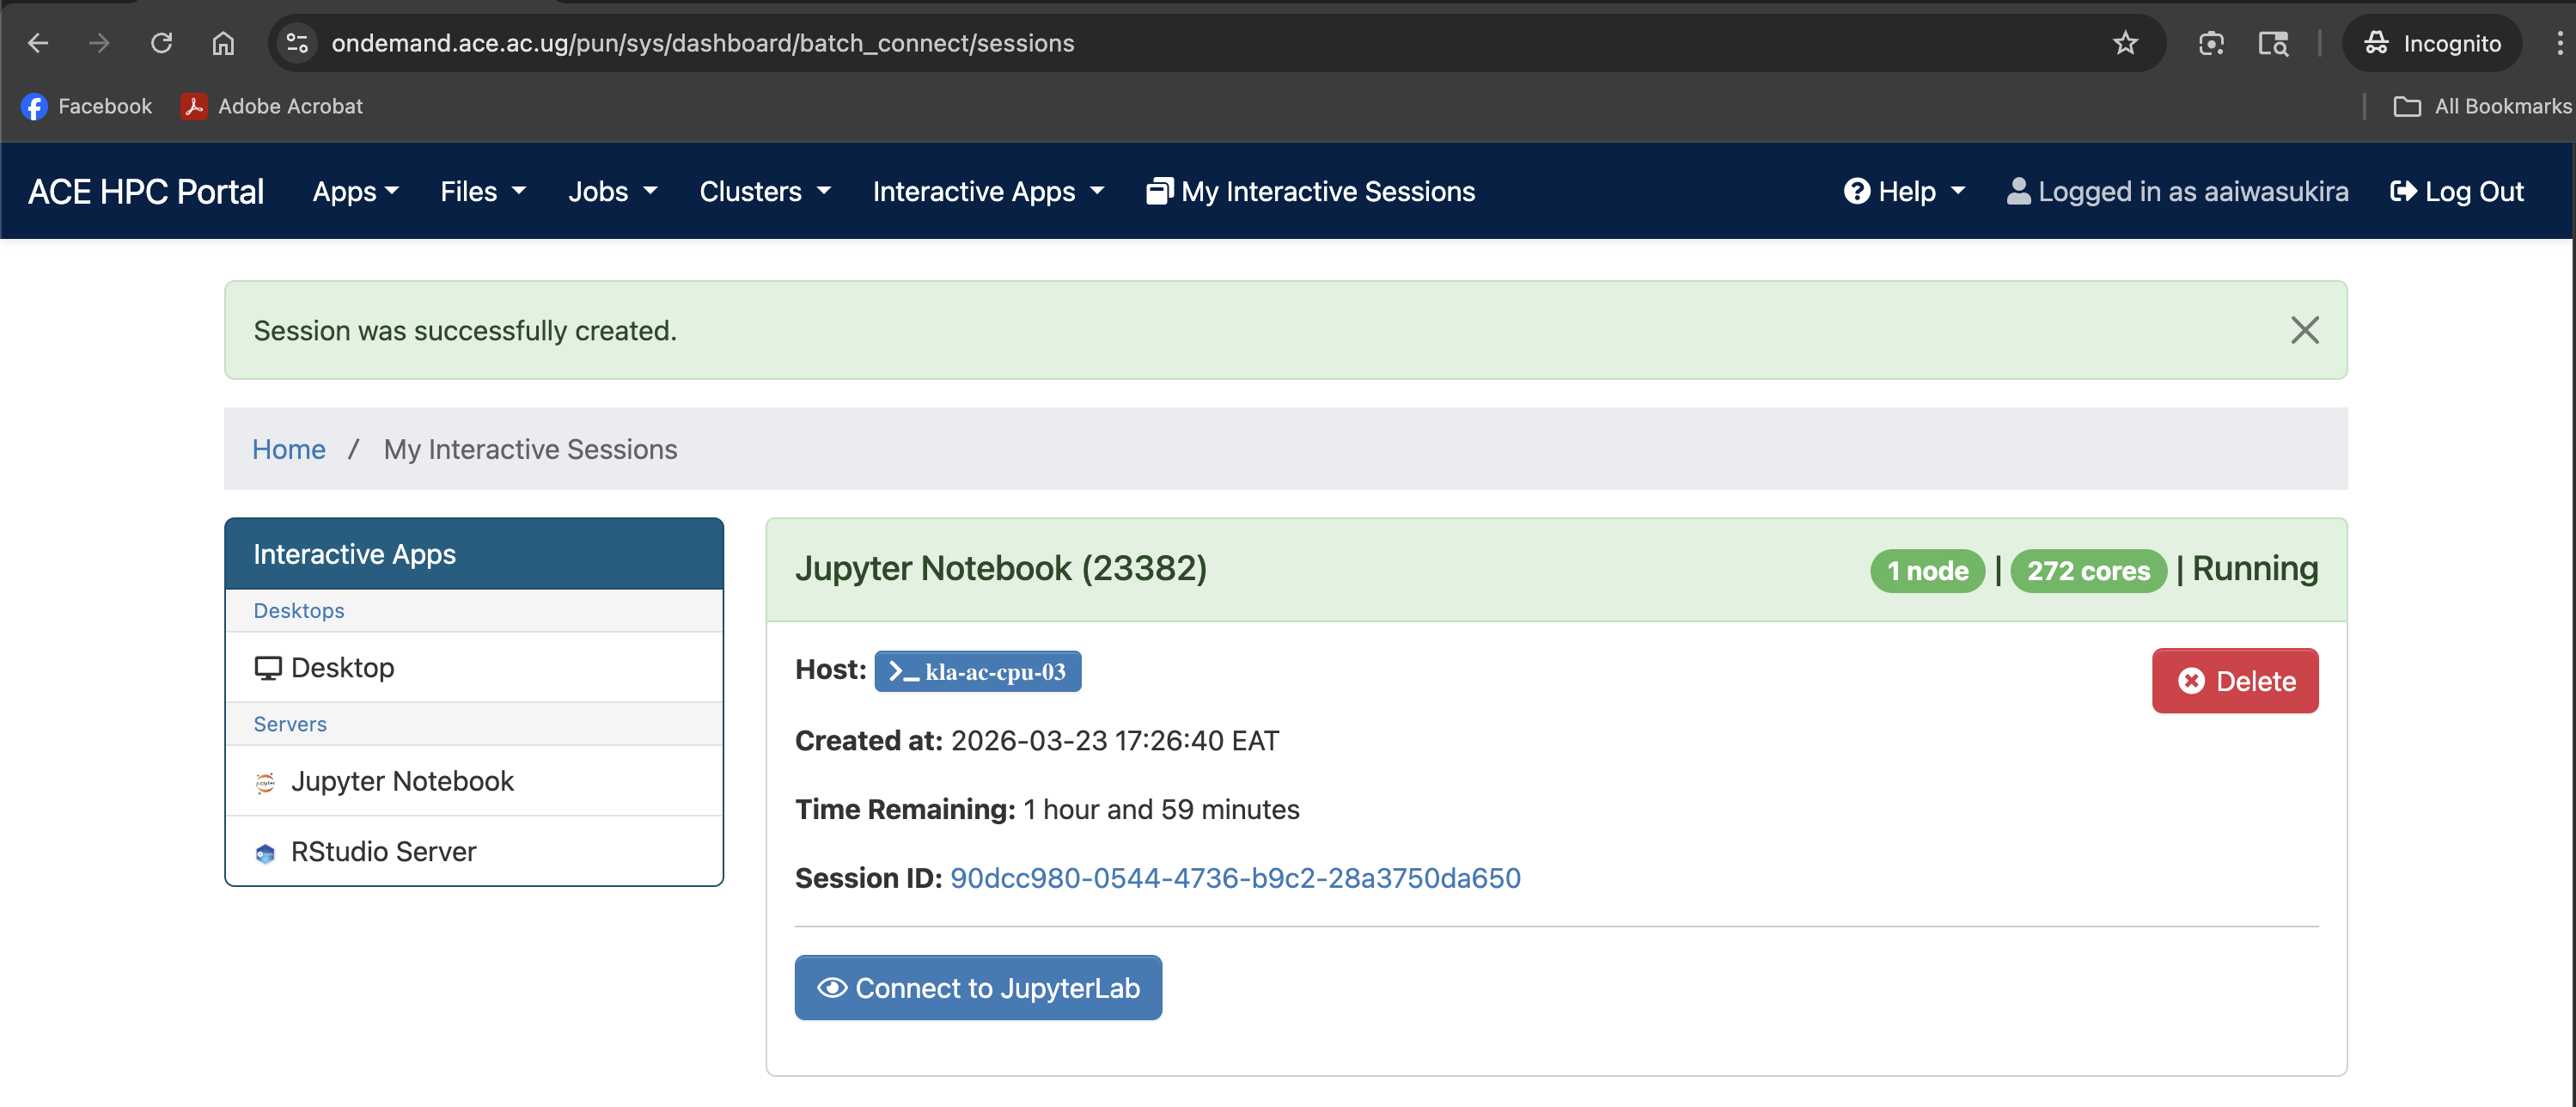
Screenshot note: A screenshot showing the Connect to Jupyter Lab button after the job starts
Understanding the Launch Form
The form has four fields. All accept free-text values — there are no dropdown menus.
Modules
Modules: jupyterlab
The software module(s) to load before starting the server. The default value jupyterlab loads the JupyterLab interface. Leave this as-is unless you have a specific reason to change it (for example, loading a conda environment module alongside JupyterLab).
Number of hours
Number of hours: 2
Wall-time limit for the session. When this time expires the Jupyter server and all running kernels are shut down automatically.
| Workflow type | Suggested hours |
|---|---|
| Exploratory analysis / prototyping | 2–4 |
| Data processing pipeline | 4–8 |
| Model training (CPU) | 8–24 |
You can always delete the session early to free resources, but you cannot extend it once it has started.
CPU Cores
CPU Cores: 32
The number of CPU cores allocated to your session. Most Python code is single-threaded by default, but libraries like multiprocessing, joblib, Dask, and numba can use multiple cores.
| Scenario | Recommended cores |
|---|---|
| Exploratory / single-threaded code | 2–4 |
joblib.Parallel / multiprocessing | 8–16 |
| Dask parallel dataframe operations | 16–64 |
Requesting more cores than your analysis uses holds resources away from other users without benefiting your job. Set cores equal to what you will actually pass to multiprocessing.Pool(processes=N) or similar.
Memory (GB)
Memory (GB): 64
RAM allocated to your session. Python loads data into memory; pandas DataFrames in particular can use several times the raw file size.
| Data / task type | Suggested memory |
|---|---|
| Small datasets, general scripting | 8–16 GB |
| Genomics data processing (pandas/polars) | 16–32 GB |
| Single-cell analysis (scanpy/AnnData) | 32–64 GB |
| Large-scale ML training | 64–96 GB |
JupyterLab Interface Overview
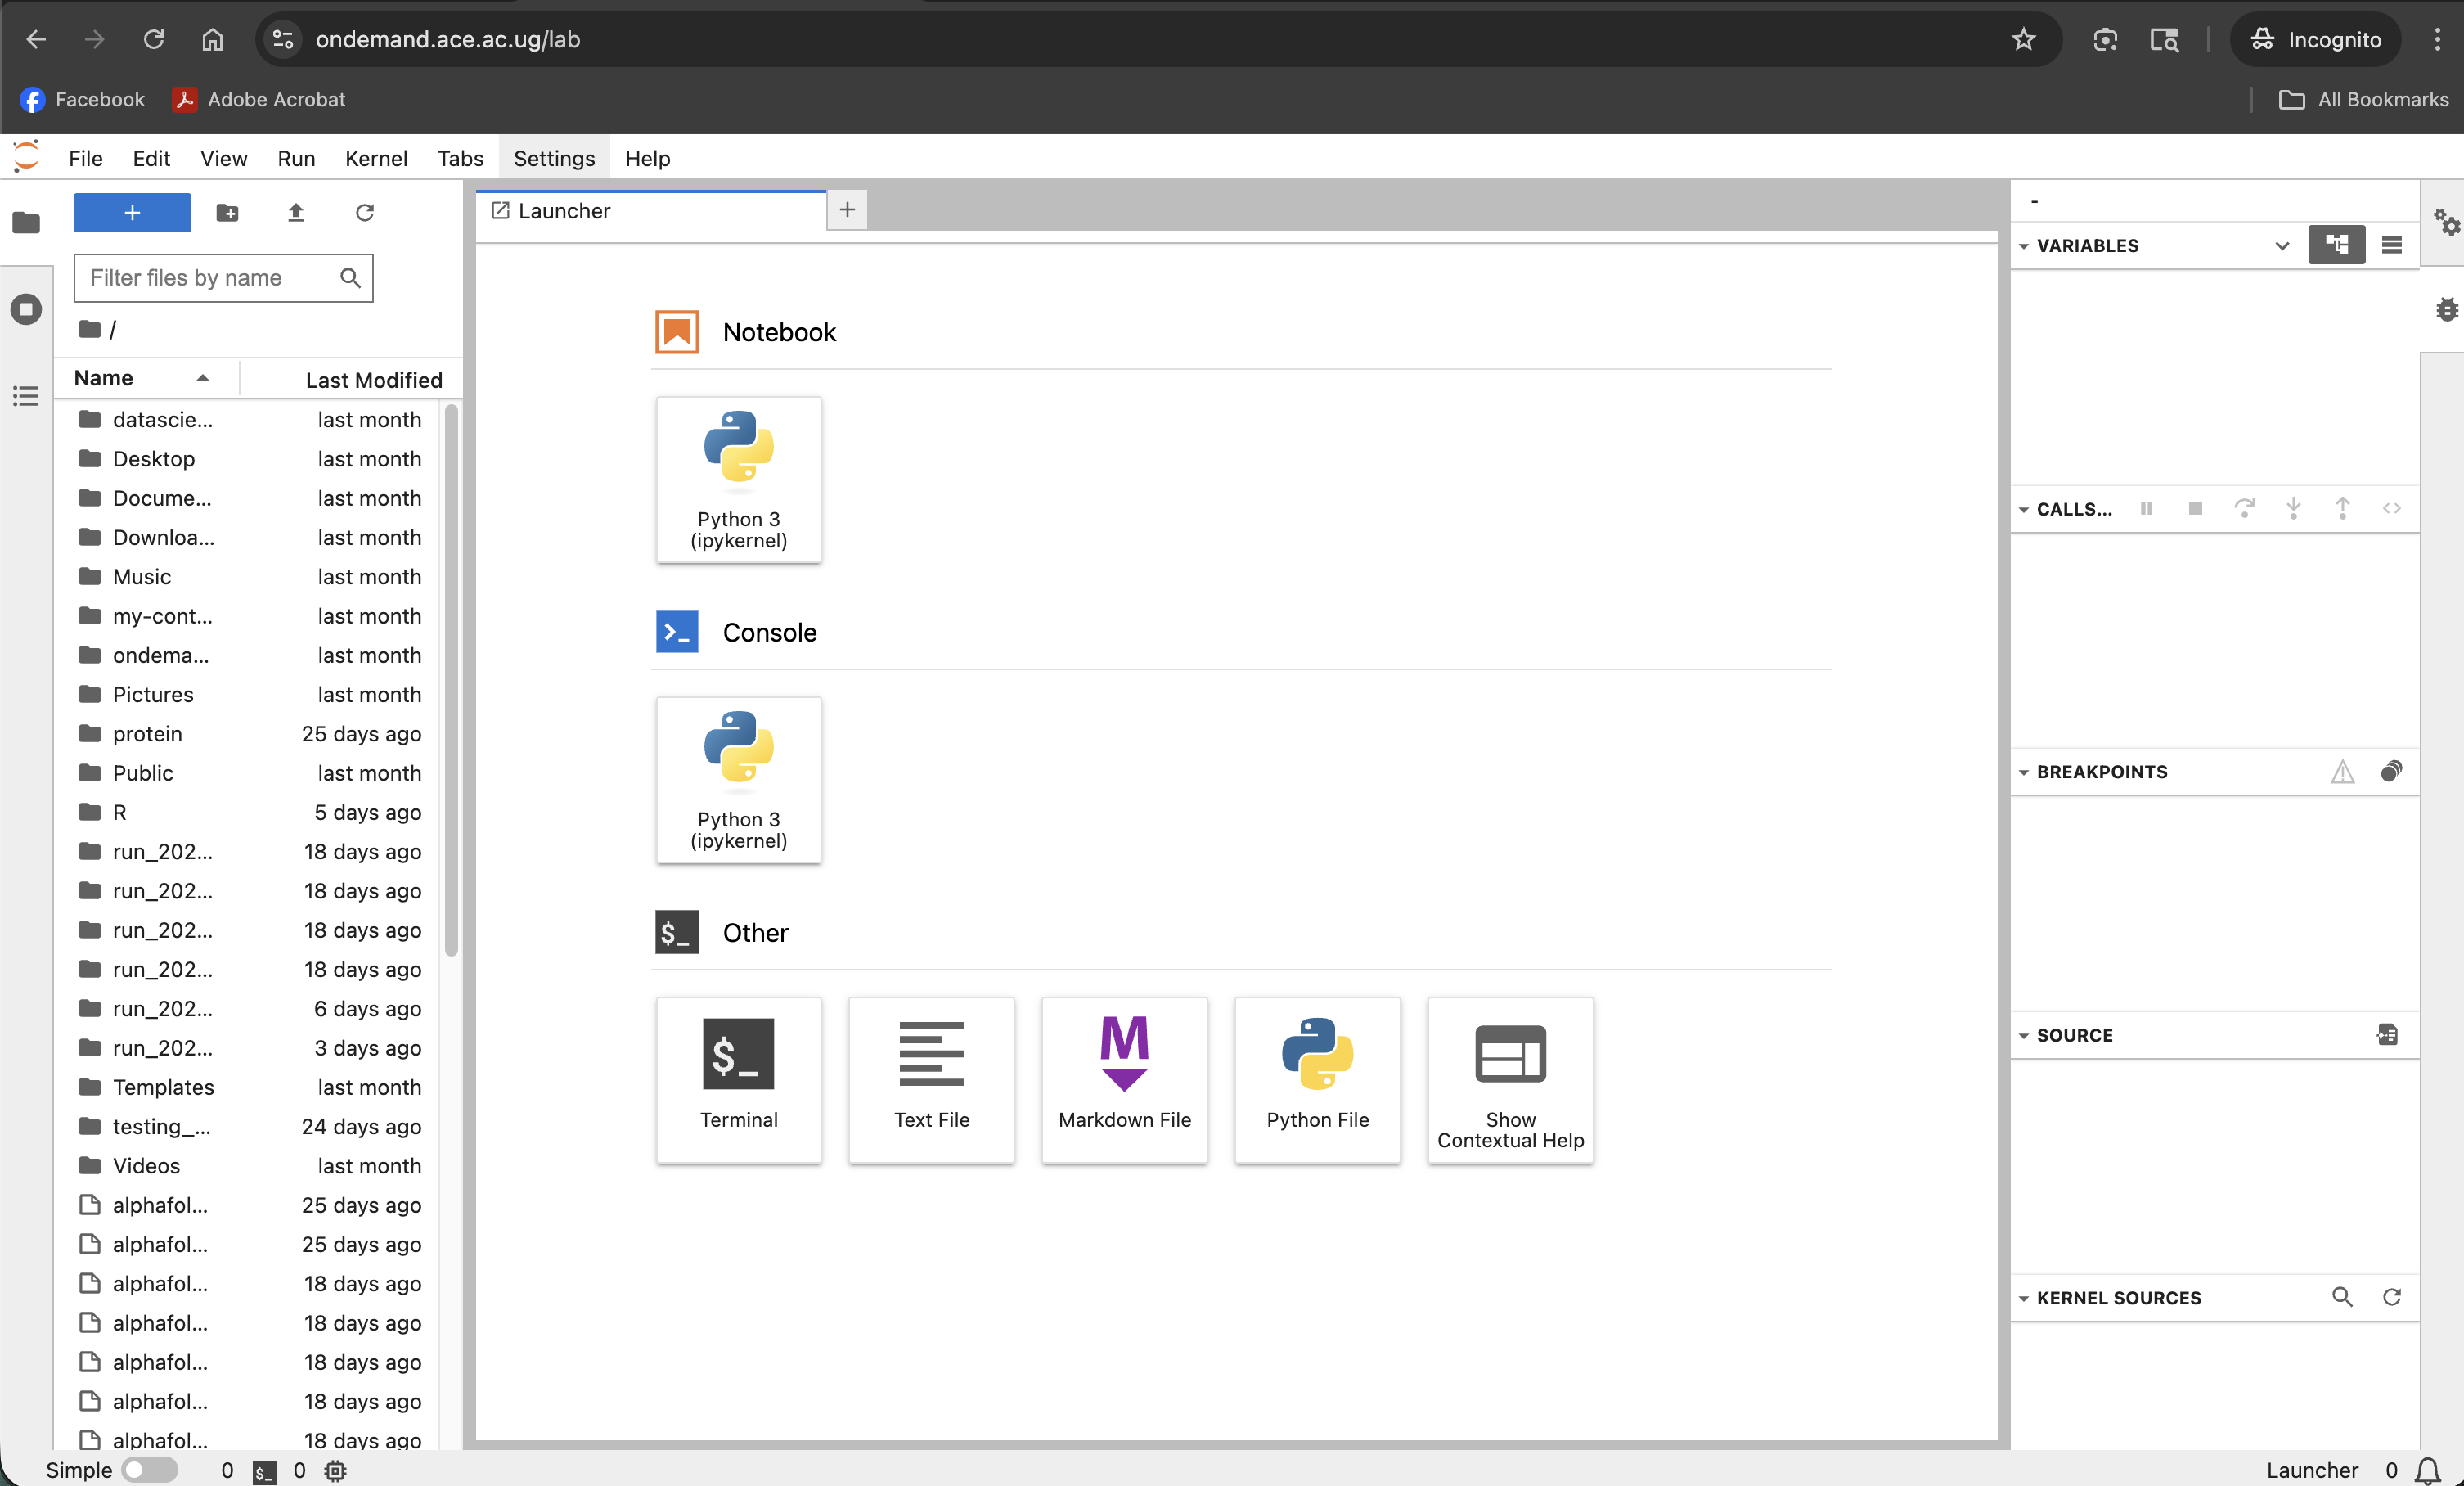
Screenshot note: A screenshot of the full JupyterLab interface after connecting, showing the file browser, launcher, and a notebook open in a tab.
| Area | Purpose |
|---|---|
| File Browser (left sidebar) | Navigate your cluster filesystem; open and create notebooks |
| Launcher | Start a new notebook, console, or terminal from the available kernels |
| Notebook tab | The active notebook with cells |
| Terminal tab | A bash terminal on the compute node |
Working with Notebooks
Creating a new notebook
In the Launcher tab, click one of the kernel icons under Notebook:
| Kernel | Use |
|---|---|
| Python 3 (ipykernel) | Standard Python notebook |
Running cells
- Run a cell:
Shift+Enter(runs and moves to the next cell) - Run and stay:
Ctrl+Enter(runs the current cell, stays on it) - Run all cells: Run → Run All Cells from the menu bar
Your working directory
The Jupyter server starts with your home directory as the root of the file browser. To find your current working directory in a notebook:
import os
os.getcwd()
# '/home/username'
To work with files in a different directory:
os.chdir('/etc/ace-data/home/username/my_project')
# or use absolute paths throughout
import pandas as pd
df = pd.read_csv('/etc/ace-data/home/username/data/samples.csv')
Accessing the cluster filesystem
The file browser in the left sidebar shows your home directory. Navigate into subdirectories by clicking them. You can also use the terminal (Launcher → Terminal) to navigate to $HOME and other paths.
Installing Python packages
From a notebook cell:
import sys
!{sys.executable} -m pip install --user seaborn
Or from the built-in terminal:
pip install --user seaborn
Packages installed with --user go into ~/.local/lib/python*/site-packages/ and persist between sessions.
If you have a conda environment set up on ACE HPC and want to use it as a Jupyter kernel, activate it in the terminal, install ipykernel, and register it:
conda activate myenv
pip install ipykernel
python -m ipykernel install --user --name myenv --display-name "Python (myenv)"
After refreshing the Launcher, Python (myenv) will appear as a kernel option.
Using the built-in terminal
JupyterLab includes a full terminal (Launcher → Terminal). This runs on the same compute node as your notebook, so you can use it to:
- Run shell commands alongside your notebook work
- Install packages
- Check running processes
- Navigate the filesystem
Saving notebooks
Notebooks autosave every few minutes. You can also save manually with Ctrl+S. Notebooks are saved to the cluster filesystem as .ipynb files and persist after the session ends.
To download a notebook to your local machine: right-click the .ipynb file in the file browser → Download.
Ending Your Session
When you are finished:
- Save all open notebooks (
Ctrl+Sor File → Save Notebook) - Return to the Open OnDemand dashboard tab
- Find your session in My Interactive Sessions
- Click Delete to terminate the session and release the compute node
An idle Jupyter session keeps a SLURM allocation active, blocking those resources from other users. Save your work and delete the session as soon as you are done.